Use Microsoft Word to automate your tables of contents and authorities
A step-by-step guide to setting up Word to automate brief writing
One of the most frustrating aspects of brief writing is the amount of time it takes to compile the table of contents and table of authorities. In the early years of our practice, I would finish my memorandum and then spend a lot of time formatting the table of contents. As for the table of authorities, I would read the brief and write down each page where a citation appeared so that I could then input those pages into the table of authorities.
While these tasks were not difficult, they were time-consuming. To make things easier, other attorneys would recommend that I use Microsoft Word’s built-in table of contents and table of authorities feature. However, those same colleagues had no idea how to modify the settings in Microsoft Word to use those features. Without that knowledge, any attempt to use the default settings in Microsoft Word would change the line spacing of point headings, change the fonts and colors of headings, and create a table of contents and authorities that was unusable.
Due to these problems, we tweaked and modified the default settings of Microsoft Word over the years so that the program would automatically create the table of contents and table of authorities for us in the ideal format. While many firms may rely on IT professionals or support staff to configure these changes, the transition to a remote workplace may require you to configure these settings on your personal computer at home. To ease the transition, this article will walk you through the modifications you need in order to automate the creation of those tables when you write a brief.
For the purposes of this article, I am using the most up-to-date version of Microsoft Word for Mac, which is available through the Microsoft 365 plan. For those Windows users reading this article, the same settings are available to you in the Windows version of the software. The location of the menus may be slightly different, but the changes to the settings are the same. Where differences do exist, this article will make reference to the alternate locations.
Starting point: Modify the normal style in your Word document
Microsoft Word builds a table of contents from different pre-configured “styles,” which it automatically includes in every version of its software. The problem with the pre-configured styles is that they are not in the format you need in order to have your brief look presentable. For this reason, you need to modify the styles before you begin writing your brief.
The first style that you need to modify is the “Normal” style. The “Normal” style is the foundation for your standard paragraph that falls underneath a point heading. By modifying the “Normal” style at the outset, it ensures that you can click on the “Normal” style any time you need to switch the formatting back to a regular paragraph. It also helps avoid other formatting problems that could arise when you modify the “Heading” styles and “TOC” styles.
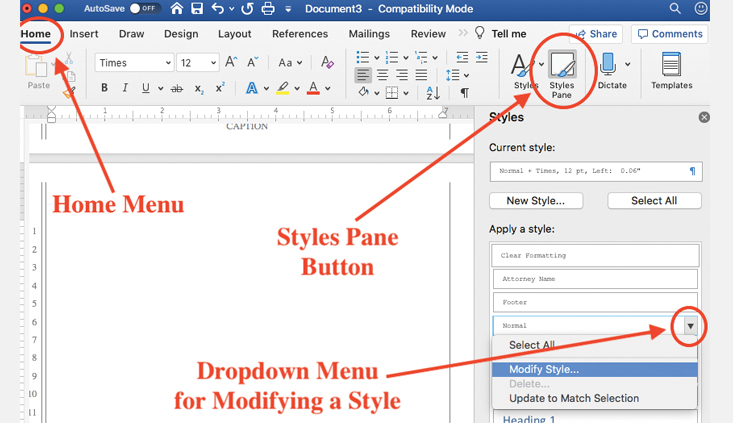
To start modifying styles, you need to open up the “Styles Pane.” On a Mac, the “Styles Pane” is located within the “Home” menu above your document. To find the button, you may need to expand the size of the window in order for all the menu items to appear. Once you locate it, click the button and the Styles Pane should open on the side of your word document. (See Fig. 1)
In Windows, the Styles Pane is located within the “Home” menu, but you need to find the small arrow at the bottom right corner of the Styles section. When you click on the arrow, the Styles Pane will open up.
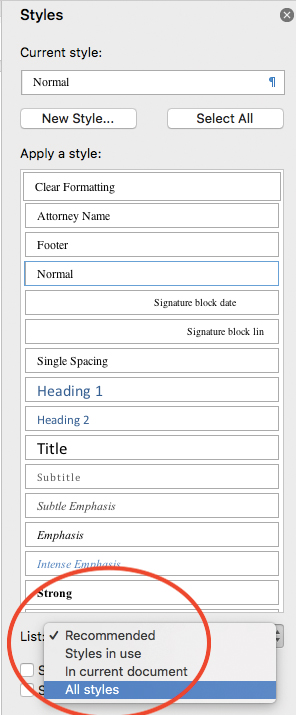
When the Styles Pane is open, you will see a list of a variety of different styles. However, Word hides a lot of the styles by default when you first open the Styles Pane. To fix this, you need to change the option setting to show you “All styles” rather than “Recommended” or “Styles in use.” On a Mac, there is a dropdown menu at the bottom of the Styles Pane that allows you to make the change. On Windows, you must click the “Options” button at the bottom of the Styles Pane, which opens a pop-up dialog window to make the change. (See Fig. 2)
Once you have all the styles displayed, it is time to begin modifying the “Normal” style. Start by typing out a generic paragraph on the page. After it is typed out, select the entire paragraph and adjust the font, line spacing, and other formatting options that you use for a standard paragraph in your brief. Keep in mind that many legal pleading templates use 22.75pt for the line spacing to make the text align with the line numbers on the side of the page. You may need to fiddle with different line spacing to get it to line up correctly on your legal pleading template.
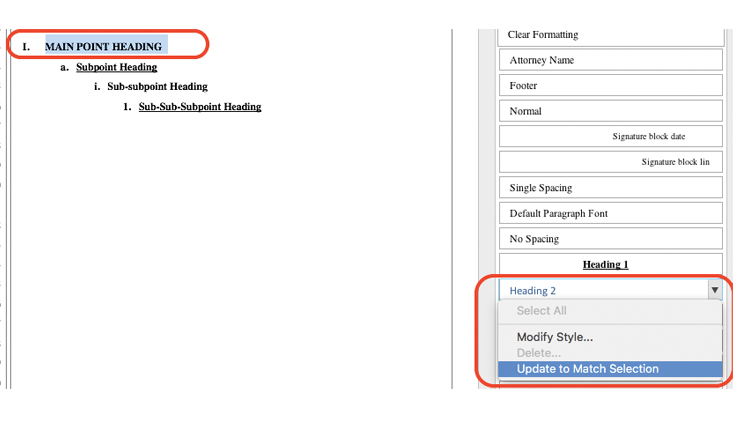
After the formatting is correct, you need to select the entire paragraph to modify the “Normal” style to match. When selected, you need to find the “Normal” style in the Styles Pane, click the downward arrow that will appear when you hover over the “Normal” style in the list, and then select “Update to Match Selection”(see the first screenshot in this article). Take special care to click the arrow rather than the name of the style, because clicking the name of the style will modify your paragraph into Word’s default “Normal” style. If you completed this step correctly, then the style of your paragraph should not have changed. After this step is done, you can select any text in your document at any time and click on the “Normal” style to revert the text into your standard paragraph format.
Step Two – Create a section title and numbered list to use for your headings
After modifying the “Normal” style, you are ready to create the foundation for modifying the “Heading” styles. There are a number of different ways to make the required modifications. However, the following steps are a reliable way to make the necessary changes.
Begin by typing out “Memorandum of Points and Authorities” on the page and adjusting its formatting into the style you typically use for such a title. This is an important step, because any table of contents will need to list such a title even though it is not part of the point headings. After you have finished that step, hit “Enter” or “Return” and type out a letter or two on the next line. Select those letters and click the “Normal” style to make sure the text following the heading is in the “Normal” style. Once you have done that, you can delete the letters such that your cursor remains on the same line where you just had the letters.
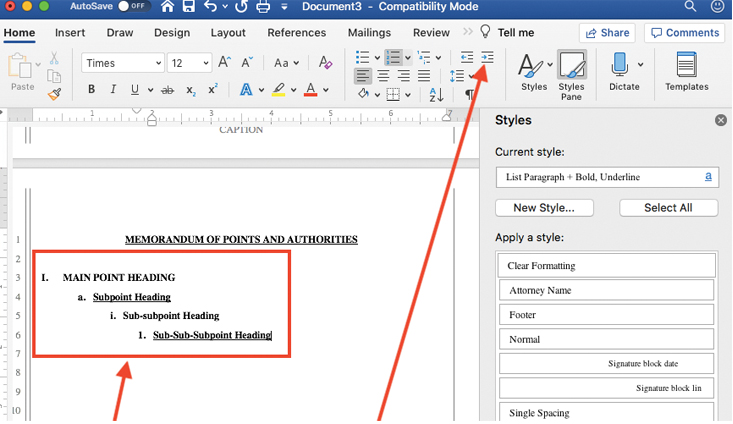
With the cursor in place, you need to navigate to the “Home” menu and find the drop-down menu for creating a numbered list. There is also a multi-level list option, which could be used, but the numbered list option is preferable to avoid a variety of formatting issues that would occur in subsequent steps. From the numbered list options, I recommend selecting the list that uses Roman numerals. (See Fig. 3)
After you select the list option, the first number in the list will be pasted into your Word document. Start by typing in a random name for the first heading. It is irrelevant what you type down, but it is important that the font style is the way you want it to be at that level. For example, you may want the first point heading to be ALL CAPS without underlining, whereas you may want the second level of point heading to be in Title Case and underlined. This is really a point of preference, but you need to format each level at this stage of the process.
Once you finish the first point heading, proceed to hit the “Enter” or “Return” button, which will bring up another Roman numeral on the next line. Since you are attempting to define the styles for multiple levels, you need to click the “Increase Indent” button within the “Home” menu to move this second numeral forward. This will change it from a Roman numeral to your next level of numbering. (See Fig. 4)
I recommend that you repeat this process until you have four different levels in your numbered list. As far as brief writing goes, it is generally overkill to have more than four different levels in your point headings.
Step Three – Match your section title and numbered list to your heading styles
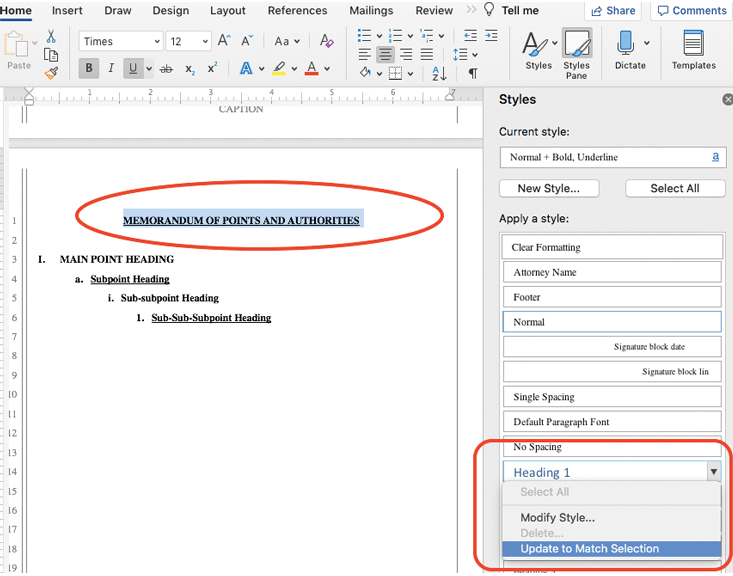
Once you have formatted your section title (e.g., Memorandum) and numbered list, you need to match the section title and each level of the numbered list to a corresponding “Heading” style. As mentioned above, you will want your section title to become part of the table of contents, which means that you need to assign the “Heading 1” style to match the section title rather than the first point heading. To do this, you simply follow the same steps you took when you originally updated the “Normal” style, but you update the “Heading 1” style instead this time. (See Fig. 5)
After updating the “Heading 1” style to match the section title, proceed to match each of the point heading levels to the next “Heading” style in order. For example, the “Heading 2” style should be updated to match the first main point heading (i.e., Roman numeral I), the “Heading 3” style to match the first subpoint heading, and so on. (See Fig. 6)
After you have completed each of these steps, you can then simply type text onto the page, select it, and then click the respective “Heading” style that you want. By doing so, it will automatically turn that text into the type of point heading that you want to use. This is a crucial thing to do, because Word will not add a point heading to the table of contents unless you have marked specific text with a “Heading” style.
Step Four – Modifying your TOC styles and creating your table of contents
Once you have your “Heading” styles updated, it is time to test out the table of contents feature and make any necessary modifications to the “TOC” styles. Although you can erase the generic numbered outline you just created, you should leave it in place so that Word has something to build the table of contents from at this point.
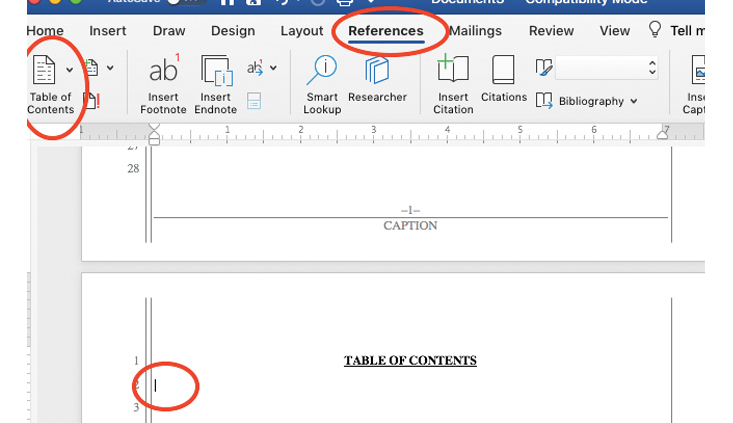
Start by finding a location earlier in your Word document where you can place a table of contents. I like to place my cursor at such an area and click the “Normal” style to ensure that I am not associating the “Heading 1” style with the “Table of Contents” section title. After clicking the “Normal” style, you should type out “Table of Contents,” center-align, and format it to personal preference. Then, proceed to place the cursor on the next line, which is where you will insert your table of contents. After placing your cursor, click on the “References” menu located near the “Home” menu. At the far left of the “References” menu, there should be a drop-down menu for table of contents. Click on the drop-down menu and select “Custom Table of Contents.” (See Fig. 7)
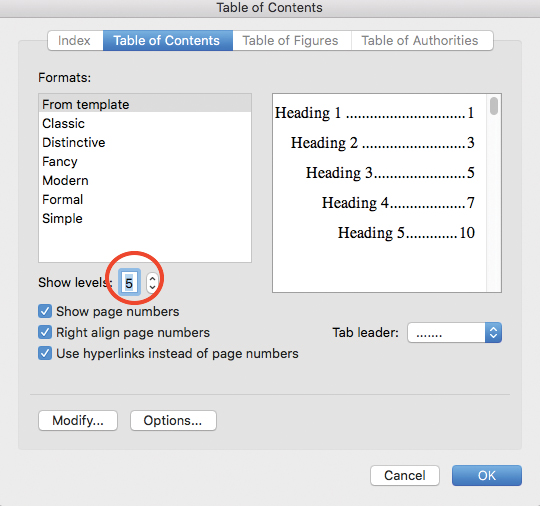
A dialog window will open for customizing the table of contents. In this window, the only thing you need to change is the setting entitled “Show levels.” This setting governs how many levels of your headings should be shown in your table of contents. Since you want both the section title (i.e., Memorandum) and each level of your numbered list to show, you need to change the default from “3” to the number of headings you want to show (i.e., “5”). Remember, the section title “Memorandum” serves as the first heading, so if you have four levels in your numbered list, then the total headings to show is 5. (See Fig. 8)
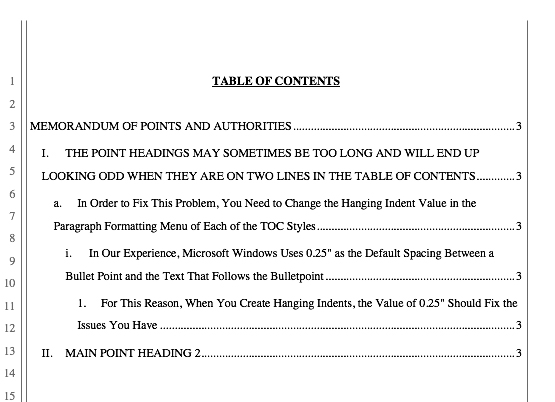
After you make the modification and click “OK,” the table of contents should paste directly into your document with each of the headings you defined earlier. If you did not type a lot into the generic headings you created earlier, then everything may look perfect to you. However, if the generic headings had the length of an actual point heading, then you will see a problem when the point heading spreads across two lines of the inserted table of contents. Specifically, the second line of a point heading will not be aligned with the first line in the table of contents. (See Fig. 9)
To fix this problem, you need to make a modification to each one of the “TOC” styles that are used in the table of contents. Since you hopefully used a total of 5 headings, you only need to modify TOC 1, TOC 2, TOC 3, TOC 4, and TOC 5 styles. Luckily, since Word uses 0.25” as the standard distance between a bullet point and the text that follows it, all you need to do is to add a hanging indent in the paragraph formatting section of each TOC.
To kill two birds with one stone, I will also recommend another common change in the formatting sections of each TOC style, which is to define a right indent of 0.25” in each style as well. This ensures that the text of your point heading in the table of contents does not get too close to the page numbers.
Begin by going back to the Styles Pane and locating the TOC 1 style. This time around you will not be selecting any text first. Instead, you want to hover over the TOC 1 style, click its drop-down menu arrow, and select “Modify Style...” In Windows, this will simply say “Modify.” Once you click “Modify Style,” a dialog window will pop open. At the bottom left of the dialog window there will be another drop-down menu button with the word “Format” on it. Click the drop-down menu and select “Paragraph...” Another dialog window will pop up, which allows you to adjust the indentation settings for TOC 1. In this window, you should change the right indent to “0.25” and then select “Hanging” indent in the drop-down menu entitled “Special.” Then, in the box next to “Hanging,” type in 0.25.” After these steps are completed, click “OK” to exit out of all the dialog windows. Repeat this step for TOC 2, TOC 3, TOC 4, and TOC 5 styles. (See Fig. 10)
Return to your table of contents after completing these steps. You will notice that the table of contents still does not look right, because you need to update the table of contents after making these changes. To update the table of contents, you need to hover your cursor over the table of contents and click on it while holding the control button on your keyboard (right-click if using Windows). This will bring up an option to “Update Field” or “Update Table,” which you should click. Once that is done, it should update the table of contents and fix the earlier issue.
Congratulations. You have now completed the setup for automating your table of contents in future briefs. There are other small formatting changes that you can make depending on your personal preferences, but these main steps will give you a standard table of contents to use in the future.
Step Five – Marking citations and automating the table of authorities
Now that you have modified Word’s settings to generate a table of contents, the next step is for you to learn how to make citations in your brief that Word will turn into a table of authorities. My first recommendation in taking this next step is to ignore the advice that Microsoft provides, because it is not very proficient in handling your citations when you use certain short-form references such as Id., Ibid., and supra. Moreover, to guarantee that the software captures all your citations, you need to be marking citations as you write rather than after you finish the brief.
Begin by placing your cursor in your document somewhere after the “Memorandum” section and the numbered list. Type out a citation in full form, whether it is a real citation or not. For this example, I typed out a fake pinpoint citation in the format of the California Style Manual, i.e., Johnson v. Johnson (2019) 200 Cal.App.4th 200, 695. Since your first citation to any case will be in full citation format, this should not pose an issue
After typing out your citation, you need to select the entire citation except for the pinpoint cite. In our example, you would select “Johnson v. Johnson (2019) 200 Cal.App.4th 200” and nothing else. Once selected, you need to go back to the “References” menu in the ribbon and click the “Mark Citation” button toward the far right of that menu. When you click “Mark Citation,” a dialog window will open up. In the window, it will have four main sections: “Selected Text,” “Category,” “Short Citation,” and “Long Citation.”
The “Category” section allows you to identify where the citation should appear in your table of authorities. If you want to create a custom category for inclusion in the table of authorities, you can click “Set Category” (in Windows “Category...”). As for the “Short Citation” section, it allows the user to assign a short-form citation for subsequent references to a particular case. The idea is that Word will automatically find and mark all the citations with that short-form format.
However, the “Short Citation” section creates problems when you use Id., Ibid., and supra. For this reason, you should think of the “Short Citation” box as an easy way to link up citations when you manually mark each and every Id. and supra citation. In other words, you should select each Id. and supra citation as you write your brief and then click “Mark Citation” for each one. When you do that, the dialog window will open up and you can then click on the short citation that you created earlier to refer to the full case citation. Otherwise, Word will miss some references that you made to a case or statute.
As for the “Selected Text” section, there is an important trick to know and apply in order to have your table of authorities section look right. The selected text section will show the full citation that you selected before you hit “Mark Citation.” However, if you do not modify the “Selected Text” section in the dialog window, then your table of authorities will be created with the case name, year, and cite on the same line. Since most table of authorities have the case name on one line and the rest of the citation on another line, you need to make a modification in the dialog window.
Specifically, place your cursor immediately before the start of your citation following the case name. Once placed, hit the “Return/Enter” key while holding the “Shift” button. The result should be that the “Selected Text” section is modified to put the citation on a different line than the case name. Do not worry, this will not modify how it looks in your brief. It simply fixes how it will look in your table of authorities. (See Fig. 11)
You may notice that Word will start showing a bunch of code on the page after you mark a citation. To hide this, go back to the “Home” menu and find the icon that looks like the ¶ symbol. Click on that symbol and it will hide the code that appears after you mark a citation.
After you have marked your first citation, it is time to try making a table of authorities. Scroll back to a section of your document right after the table of contents section. Once there, type out “Table of Authorities,” as you did for the “Table of Contents.” However, in this situation, you should select “Table of Authorities” and click on the “Heading 1” style so that it becomes part of your table of contents. After you do that, hit “Return/Enter” so that your cursor is on the next line. Once there, it’s time to insert the table of authorities.
To insert the table of authorities, you need to navigate to the far right of the “References” menu. There you will find a button for inserting the table of authorities. You may need to hover over it to see the name. The icon looks like a page with a tiny red page in its bottom right corner. Click the button and a dialog window will open up. Click OK in the dialog window and your table of authorities should now be pasted onto your page.
Congratulations. You have now learned how to automate the table of authorities. There may be times that you want to modify the spacing between cases or make other tweaks to your design. However, this guide should provide you with a straightforward way to automate these processes for a basic, conforming table of contents and table of authorities.
Nicole Lari-Joni

Nicole Lari-Joni is a partner at Lari-Joni & Bassell, LLP. With Torsten Bassell, they compose a trial team which has obtained multiple, multi-million dollar verdicts throughout Southern California. In 2011, Ms. Lari-Joni was named CAOC’s Woman Trial Lawyer of the Year. Their verdicts have also been featured in The Recorder’s annual edition of the Top California Million Dollar Verdicts. Presently, the firm maintains offices in Los Angeles and Santa Barbara.

Copyright ©
2026
by the author.
For reprint permission, contact the publisher: Advocate Magazine